
Note: if this is your first time applying the Sigafoos Series I™ shoes, practice placing the shoe before mixing the adhesive! We recommend the use of stretch wrap to secure the shoe to the hoof while the adhesive sets – make sure you have a tail unrolled from the stretch wrap BEFORE you mix the adhesive … things tend to move mighty fast when you mix the adhesive and you won’t have time to find the tail.
- WEAR RUBBER GLOVES!! Mix the adhesive according to manufacturers directions. The practical working time is 3-5 minutes (depending on the ambient temperature) before the adhesive begins to set.
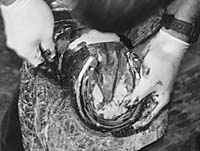
- Immediately after mixing the adhesive apply a generous layer of adhesive to the hoof wall. If the temperature is cool (below 50 F) use a heat gun to heat the hoof slightly while the foot is on the ground. This will improve the wet-out of the adhesive on the hoof, and will help to set the adhesive on the foot.
- Saturate the layers of the fabric cuff with adhesive taking the time to work the adhesive into the fibers. It is important to fully saturate the fabric. Before placing shoe on the hoof, run your finger on the top of the rim pad to assure there is no adhesive on that surface. DO NOT bond the shoe to the bottom of the hoof!
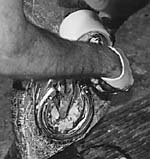
- Place the shoe firmly onto the hoof, and smooth the fabric down over the sides of the hoof wall.
- Tape the shoe in place. Starting from the toe of the shoe, wrap the shoe with stretch wrap so that the toe is pulled down and onto the hoof, with pressure toward the back of the hoof
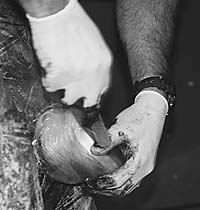
- Continue wrapping the hoof from the toe of the shoe to the bulbs of the heels. NOTE!! Be sure to wrap the tape well up over the bulbs of the heels, or the shoe will slide forward on the hoof.
- Wrap the tape across the heels and up over the front of the hoof well up over the coronet band at the toe. This will form a “figure 8” taping pattern over the hoof. The horse can now place its foot on the floor.
IMPORTANT!!
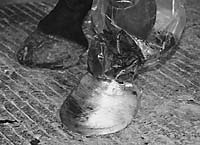
The tape must be wrapped well up over the bulbs of the heels in back of the foot, and well up over the coronet in front of the foot. If the tape is placed too low, the shoe will slide forward on the hoof. - The adhesive will harden sufficiently after about 10-12 minutes so the tape wrap can be removed.


[divider_flat]

[divider_flat]

[divider_flat]